
Perplexity AI is a cutting-edge AI-powered search engine that can generate tables to present data in a clear and organized format. Whether you need a simple data table, a comparison table, or a complex statistical table, Perplexity AI has got you covered. However, extracting these tables can sometimes be tricky, especially if you’re new to the platform. In this comprehensive guide, we’ll walk you through the process of copying tables from Perplexity AI, covering both standard copy-paste methods and advanced techniques, with illustrations to help you visualize each step.
Understanding Perplexity AI’s Table Formats
Before we dive into the copying process, it’s essential to understand the different table formats used by Perplexity AI. The platform generates tables in various formats, including:
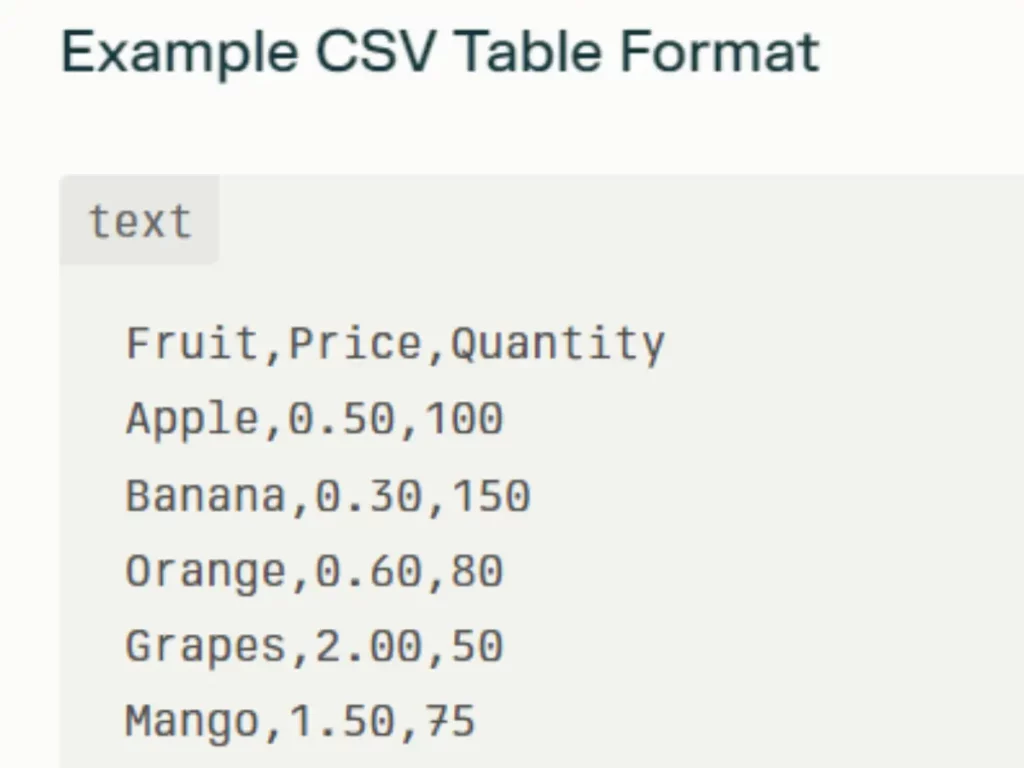
CSV (Comma-Separated Values): Ideal for importing data into spreadsheet applications like Microsoft Excel or Google Sheets.
Breakdown of the Example
Header Row: The first line contains the column headers, which describe the data in each column. In this case, the headers are Fruit, Price, and Quantity.
Data Rows: Each subsequent line represents a record in the table:
Apple costs $0.50 and there are 100 units available.
Banana costs $0.30 with 150 units available.
Orange costs $0.60 with 80 units available.
Grapes cost $2.00 with 50 units available.
Mango costs $1.50 with 75 units available.
How to Use CSV Files
Creating a CSV File: You can create a CSV file using any text editor (like Notepad or TextEdit) by typing the data in the format shown above and saving the file with a .csv extension (e.g., fruits.csv).
Opening a CSV File: CSV files can be opened in spreadsheet applications like Microsoft Excel, Google Sheets, or any text editor. When opened in a spreadsheet application, the data will be displayed in a structured table format.
Importing CSV Files: Many applications allow you to import CSV files to analyze or manipulate the data easily.
HTML Tables: Useful for displaying data on web pages.
Example HTML Table
xml
<table>
<caption>Fruit Price List</caption>
<thead>
<tr>
<th>Fruit</th>
<th>Price</th>
<th>Quantity</th>
</tr>
</thead>
<tbody>
<tr>
<td>Apple</td>
<td>$0.50</td>
<td>100</td>
</tr>
<tr>
<td>Banana</td>
<td>$0.30</td>
<td>150</td>
</tr>
<tr>
<td>Orange</td>
<td>$0.60</td>
<td>80</td>
</tr>
<tr>
<td>Grapes</td>
<td>$2.00</td>
<td>50</td>
</tr>
<tr>
<td>Mango</td>
<td>$1.50</td>
<td>75</td>
</tr>
</tbody>
</table>
Breakdown of the Example
<table>Tag: This tag defines the start of the table. All table content will be enclosed within this tag.<caption>Tag: This optional tag provides a title for the table. In this example, it indicates that the table is a “Fruit Price List.”<thead>Tag: This section contains the header of the table, which typically includes the column titles.<tr>Tag: This tag defines a row in the table. The first row contains the headers.
<th>Tag: This tag defines a header cell. In this case, it specifies the columns: Fruit, Price, and Quantity.
<tbody>Tag: This section contains the main body of the table, which holds the actual data.- Each row of data is defined using the
<tr>tag.
- Within each row, the
<td>tag is used to define individual data cells. For example, the first row of data contains:- Apple (fruit name)
- $0.50 (price)
- 100 (quantity)
- Each row of data is defined using the
How to Use HTML Tables
- Creating an HTML Table: You can create an HTML table by writing the markup in an HTML file. Save the file with a
.htmlextension (e.g.,fruits.html). - Viewing the Table: Open the HTML file in a web browser to view the table rendered in a structured format.
- Styling the Table: You can use CSS (Cascading Style Sheets) to style the table, changing colors, borders, padding, and fonts to improve its appearance.
Advantages of HTML Tables
- Structured Data Presentation: HTML tables allow for organized and easy-to-read data presentation.
- Web Compatibility: They are widely supported across all web browsers and can be easily integrated into web pages.
- Accessibility: When properly structured, HTML tables can be made accessible to screen readers, improving usability for visually impaired users.
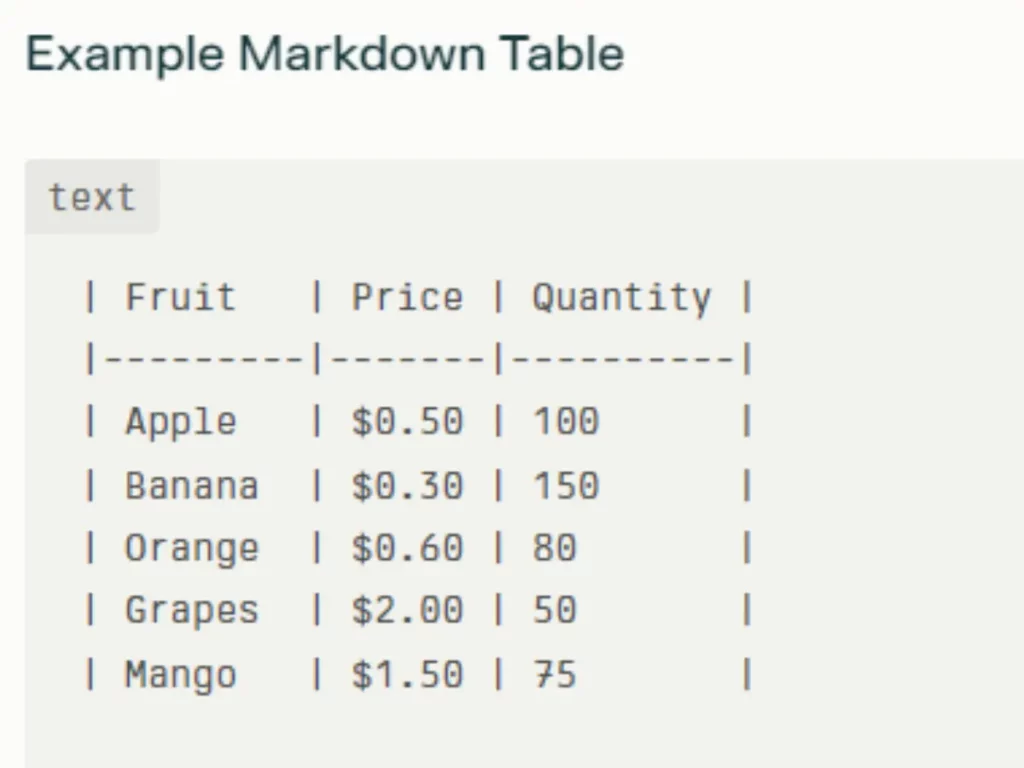
Markdown Tables: Great for documentation and easy readability.
Breakdown of the Example
- Table Structure:
- The table is defined using vertical bars (
|) to separate columns.
- Each row of the table is written on a new line.
- The table is defined using vertical bars (
- Header Row:
- The first line contains the column headers: Fruit, Price, and Quantity.
- Each header is separated by a vertical bar.
- Separator Row:
- The second line contains dashes (
-) to separate the header from the data.
- The number of dashes can vary, but it must be at least three for each column to indicate that it is a header.
- The second line contains dashes (
- Data Rows:
- Each subsequent line represents a row of data in the table.
- For example, the first data row contains:
- Apple (fruit name)
- $0.50 (price)
- 100 (quantity)
How to Use Markdown Tables
- Creating a Markdown Table: You can create a Markdown table by writing the text in a Markdown editor or any text editor that supports Markdown syntax. Save the file with a
.mdextension (e.g.,fruits.md). - Viewing the Table: To view the rendered table, you can open the Markdown file in a Markdown viewer or a text editor that supports Markdown preview, such as Visual Studio Code, Typora, or GitHub.
- Styling and Formatting: Markdown tables are simple and do not support advanced styling options like HTML tables. However, you can control the alignment of the text in the columns by adding colons (
:) in the separator row::---for left alignment
:---:for center alignment
---:for right alignment
Knowing these formats will help you choose the best method for copying and using the data.
Perplexity AI Table Formats
Using Standard Copy-Paste for Tables
Copying tables using the standard copy-paste method is the simplest way to transfer data from Perplexity AI. Follow these steps:
1. Generate the table:Use Perplexity AI to create the desired table based on your query.
2. Select the table: Click and drag your cursor over the entire table to highlight it.
3. Copy the selection: Use the keyboard shortcut Ctrl+C (Windows) or Command+C (Mac) to copy the selected table.
4. Paste into your desired application: Open your spreadsheet or document and use Ctrl+V (Windows) or Command+V (Mac) to paste the table.
5. Adjust formatting as needed: Depending on where you paste the table, you may need to adjust the formatting to match your document’s style.
Standard Copy-Paste Method
Using Browser Developer Tools
If the standard copy-paste method doesn’t work or you need to preserve the table’s structure, you can use browser developer tools. Here’s how:
1. Right-click on the table: Select “Inspect” from the context menu to open the developer tools.
2. Find the table’s HTML code: In the developer tools, locate the HTML code that represents the table.
3. Copy the HTML code: Right-click on the HTML code and choose “Copy” > “Copy element” or “Copy outerHTML”.
4. Paste the HTML code: Open an HTML editor or compatible application and paste the copied HTML code.
Taking Screenshots
For tables with complex formatting that don’t copy well using other methods, taking a screenshot can be a viable option. Use a screenshot tool like Snipping Tool on Windows or Shift + Command + 4 on macOS to capture the table. Save the screenshot as an image file and use it as needed.
Exporting to CSV or Excel
If Perplexity AI offers an export option, you can choose to export the table data as a CSV or Excel file. Look for an “Export” or “Download” button, select the format, and download the file. This method is particularly useful for large tables or when you need to maintain the table’s format in a spreadsheet application.
Troubleshooting and Tips
If you encounter issues while copying tables from Perplexity AI, try the following:
Make sure you’ve selected the entire table: Double-check that you’ve highlighted all the necessary rows and columns before copying.
Try different methods: If one method doesn’t work, switch to another, such as using developer tools or taking a screenshot.
Check for formatting issues: If the copied table doesn’t look right in your application, adjust the formatting as needed.
Reach out to Perplexity AI support: If you’re still having trouble, contact the Perplexity AI support team for assistance.
By following these steps and techniques, you’ll be able to efficiently copy tables from Perplexity AI and integrate them into your workflows. Remember to choose the method that works best for your specific needs and device.
Check out www.perplexity.ai now to seamlessly copy tables through these techniques.
You can also check out another good read AI and Healthcare Equity: Forging the Digital Divide
Citations:
[1] https://mistertechy.exblog.jp/35830768/
[2] https://raivan.uk/how-to-copy-table-from-perplexity-ai/
[3] https://zynthiq.com/how-to-copy-a-table-from-perplexity-ai/
[4] https://starlithorizon.com/how-to-copy-tables-from-perplexity-ai/
[5] https://thebloginsider.org/how-to-copy-tables-from-perplexity-ai/
[6] https://www.thewindowsclub.com/how-to-copy-table-from-perplexity-ai
[7]https://www.reddit.com/r/questionai/comments/1esqpte/how_to_copy_table_from_perplexity_ai/
[8] https://twitter.com/TheWindowsClub/status/1822402818269155802


Leave a Reply